


Welcome to my board and batten on the cheap tutorial. Otherwise known as the longest post in the world of blog land. I'd make a pot of coffee... or get a big gulp, if you're classy like me.
So far this project has cost me under 100.00 and I'm trying really hard to add the bench and keep it under 150.00 total. I think that's pretty good for wood, glue and paint eh?
To start, get a sitter or recruit your father to tag along to herd the children when they get out of the cart. Because they will get out of the cart when you're trying to saw away at the 8 foot pieces of trim. Then switch and let him saw while you take them to the potty, 17.5 times.
True story.
I needed about 20 ( 61.5 inch long ) pieces of 1 inch trim. I believe it was about .59 cents a foot? (Anyone realizing I'm horrible at the tutorials?)

Did you ask why the heck I decided to make it 61.5 inches? Well, the previous owners didn't mud very well when they redid the entry way and that's exactly where the tape was. The placement that I have the horizontal piece covers it exactly. Believe me, I would have rather done 62 even. I don't like odd confusing numbers. Strange yes?
Next up, 12 feet of 3 inch thick trim. I builder Dad cut it into three pieces to fit into the car easier. Such a thinker that man! I also purchased the same amount of corner trim. It's L shaped which is PERFECT for a little bit of some picture leanin' love going on in the entry way I have a vision of. Some paneling glue and you're set to go! Scratch that, I had some finishing nails at home, you'll need a box of those too if you don't have a nail gun, like this chick. They're itty bitty and perfect to help hold the trim up. I only used two per piece so it's not like you'll be hammering all day.
I didn't say you wouldn't be gluing all day though.
Meet liquid nails.

This little guy will become your best friend if you don't own a nail gun. Those of you that do. Hate you...That is all.
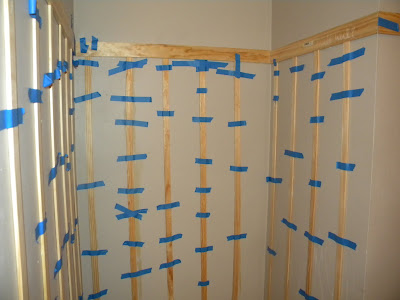
Anyway, the glue--So much less work than nails, that is if you're like me and continually miss the nail and make 1000 and 1 dents in the wall. Bead some glue on the back of the trim and slap her on the wall. Make sure to level it off, the LAST thing you want is to have the glue set and later realize it's crooked. It will throw EVERYTHING off. You knew that though right? Yes. Tape it over with painters tape to help hold it. Level. Measure again. Level again and hammer a trim nail on each end.
Then if you have major OCD like I do, measure and level one more time... Then make sure no ones watching and do it again.. Just for good measure.
Ba dum bump.
*Snort*
Continue till you're all done with the horizontal top. Using your miter saw for the corners, I'm not lucky enough to have anything power saw related so I used my little miter box saw. It worked just fine, barely broke a sweat!


Don't swear like a sailor when your corners are a bit off either, that's what wood filler is for. Works like a charm.

Now on to the vertical pieces. The battens if you will. All of them needed to be 61.5 inches long-- time to measure and cut. Over and over. Then measure the distance apart. I planned on doing every 6 inches, but that ran into a outlet-- stupid electricity. So 7 it is, I marked the first one and went on every 8 inches from there.

The absolute worst part about this trim, which made me want to give up and get some MDF and cut it into 1 inch pieces? Some of it was oh so slightly bent.

Like you looked at it and thought it was straight, and bam fooled you. Neil Patric Harris anyone?
Right...Uh...anyways.
No worries I worked around it-- hiding them behind where the bench will be. Let me tell you, after 4 hours of this I wasn't worried anymore if one piece was 1/316th too far over. It worked out. Magically.

See..when you live with the Nester's IDHTBPTBB mentality it's hard to be a master tutorializer. I don't stress the small stuff.
Once everything was glued, taped, measured, leveled, nailed, gawked at, given the champion dance to-- it was time to prime (24 hours later so the glue could set, if you're using nails- go ahead and paint). Yuck. I dread painting. I get all geeked for it for about 2 minutes. Then my arm starts to get tired. And, this particular day-- I started The Shred the night before. Let me just tell you, try holding your arm above your head to paint.. or worse yet, squatting down to get the bottom. Death. Jillian Michaels wished death upon me.
Ahem.
 I primed and then 2 hours later when it was dry caulked the imperfections. Let that dry and primed again. Once it was dry I added the L piece trim to the top for a little ledge and some more bulk to the horizontal trim. We also purchased a 12 inch deep shelf from Home Depot and cut it to fit the little alcove we have. It was the same thickness as the corner (L shaped) trim so it was a little more of a built in look, happy day!


It still needs another coat as you can tell. But I think it's 135% better, no make that 136%. It's amazing what a little paint and some trim can do! It's so much cleaner and brighter. Before and after anyone?


Don't forget to enter the Bitsy Whimsy giveaway going on!


Transformation Thursday


94 comments:
I LOVE it!
Wow! It looks so pretty.
Good job! I love this idea. It look great (:
Cute!!! I'm not sure that I have the patience though! It does look a lot better:)
~stevie
http://thriftingthedayaway.blogspot.com/
Wow this looks WAY better! I wish I had white trim in my house so I could use this idea. :( Great job!
Hey, your before wasn't that bad!! But you did a great job and the after is really neat. Good work!!
Nancy
That looks A M A Z I N G !!!! Great job!
~Dawn
Incredible transformation!!! We're about to redo our bathroom (as soon as we save up enough mulah) and I plan to use the board and baten idea because I hate puttying (sp?) drywall! Your redo makes me want to get started even sooner!!!
Looks good girl!
Oh my word, Rachelle!!!! Amazing!!! :) You should be so proud of yourself. :)
haha, love the Neil Patric Harris comment!
It really looks amazing, you did such a great job! :)
It looks awesome! Great job! I would SOOOO not have the patience for all of that.
And what a nice dad you have! :)
Looks AMAZING girl!!!!! Great job!!
Cara
So crafty! I love it!
Please feel free to link it up to Talented Tuesdays at My Frugal Family!
http://theherberfamily.blogspot.com/2010/01/talented-tuesday.html
It's beautiful!! Good Job!
Ok, so 1. I LOVE it! & 2. You are super funny! I was rolling!
That looks amazing! I wish I had been bloggin when I owned a home, so many great ideas in blogland!
Oh my WORD!! It's 137% better! I am so impressed with it. I can't wait to see it all dressed up! Great job!
So that is all just LIquid Nailed on? I've never used it and my hubby never takes shortcuts, but it seems so practical to use it. It looks awesome!
Rachelle,
This is an amazing transformation! You did a great job...very professional! Thanks so much for sharing and the tutorial!
Sharlotte
Awesome! turned out great!
It really is an amazing transformation! And yes, I totally got the NPH joke :)
It looks so good! And DANG your funny! :)
Love It!!! I had to Google IDHTBPTBP lol I haven't been following the Nester long enough to have seen that post but I love that. It may become my mission statement.
Ahhh! LOVE IT! Thank you so much for the step by step instructions- I am so totally doing this in our guest bedroom/future nursery! And I will be using a hacksaw! :)
Totally understand your Shred issues. I think she revels in our pain.
That looks fantastic!!
Great Job! I just did something similar in my entryway. It makes it look much better, more character.
Beautiful! And I give you props for pressing on with post-shred soreness. I feel your pain!
It's looking great!
Wow! Very nice! I love it!
Sandra
It turned out wonderful! It gives such a great 1st impression to your home.
That's beautiful! Good work. Your reference to Doogie made me laugh out loud. :)
Oh, my goodness! That looks amazing! I've always been afraid of tackling a carpentry project on my own, but I feel like I could maybe do this! Thanks for the inspiration!
This turned out so beautiful! You did an amazing job. I am curious, what is the texture like on your wall? We have been wanting to do a bead-board look, similar to yours, by creating the recessed look, but not putting panels down. One of the thing that I have wondered about was the fact that our walls have a texture to them, and I wonder if it looks odd once obvious once painted?
So Creative and so pretty!
Wow! That is gorgeous!!!
Fantastic tutorial! It looks amazing and I almost feel like I can do this myself now. Almost. The leveling part scares me and I know I'll be cussing like a sailor throughout the entire process...which also scares me. I'm inspired though!
I know I already commented, but I just really love what you did! It totally transforms the room.
Thanks for taking part in Talented Tuesday at My Frugal Family! Don't forget to come back next week!
That's an absolutely wonderful transformation!! It does look so bright and clean now. Love it with that green color of paint above too.
Looks amazing! Please come do that at my house!
Great job. Incredible transformation!
wow, looks great! your hard work really paid off, i LOVE it!
kudos to you! that's a magnificent outcome!
You go girl! That turned out awesome! And it looks like such a huge kinda scary project but you did it! :) Love it!
your so funny! i love this post it is very detailed and i appreciate that! well done!
Great job on the board & batten. I really want to try that somewhere too.
LOVE IT and it is definitely on my FAVS. Glad to have you back in bloggy land.
I have a fun give-a-way starting tonight
Cheri
am starting a tutorial once a week--would you like to do a tutorial on this on my blog?
Cheri
Love it! I think I could actually do this!
Wow! Great job, what a difference...LOVE it!
It looks incredible! You are much more ambitious than I am. But with this tutorial, I might even be able to do it. Although I don't really have a place in my house for this.
WOW - beautiful!!!
I've been wanting to do something like this in my daughter's room. Thanks for the tutorial! Great job.
Wonderful, very inspiring that you did that yourself all the way! The whole look is so much better than the before.
Love it! *swoon*
Looks awesome! Loving your humor!
If you can do it, I can do it. Right? You certainly make it look easy! Well, the work out/sore muscles part scares me a little to be honest. Off to check out part two.
I'm late but thanks for sharing in the DIY Show & Tell! I love it! :)
Roeshel
Pat yourself on the back, it looks AMAZING.
you have a wonderful site!
What's Happening i am fresh to this. I came upon this website I have found It extremely accessible & it has helped me alot. I should be able to contribute & help others like its helped me.
Thank You, See Ya Later.
Post a Comment